This post may contain affiliate links, please refer to our disclosure policy. Thanks for supporting this blog!

Disclaimer: I am NOT a professional, this is only an informational post of what I did as a DIYer.
*Edited post 7/8/20 to add total cost due to multiple requests
Adding 1500 Watts Solar to a 1997 Monaco Signature
I became interested in solar shortly after we started using the RV. We have a 1997 Monaco Signature that came with the all electric option from the factory. This meant we didn’t have any propane tank or propane appliances. Everything runs on either electric or diesel. We quickly realized how inadequate the 360 watt solar array on the roof actually was. It just couldn’t keep up with the power hungry residential fridge and all our other electric needs. We really needed a different solution rather than running our 10k Onan generator for hours. It was time to begin educating myself about solar arrays, specifically for RVs.
Learning and reading about electrical in the beginning was really leaving me confused and frustrated. Amps, amp hours, volts, AC, DC, watts, watt hours, converting one to another, PWM, MPPT and the list goes on and on. This shit is confusing, but I just kept reading, eventually things started making sense. By no means am I a professional, this is only an explanation of the things that I have done.
Once I got the basics covered, I needed to figure out the systems of the RV the were already installed and how to incorporate a new solar array with all the current components. We have (5) Lifeline GPL-8DA batteries, (4) 90 watt panels connected to an RV 30D PWM controller, (2) Trace 2512U Modified Sine Wave 2500 watt inverter/chargers, Trace Engineering TM500 Battery Monitor (replaced with a Victron Smart Shunt), 10k Onan diesel generator, a 270 amp alternator, and a set of diagrams that may or may not be accurate from Monaco (not everything is where they claim it is).
Initially, I was wondering if I could keep the old panels up there and just add a bunch more. I began measuring the roof and looking at all the different sizes of solar panels. Leaving 20 year old inefficient panels up there was a bad idea, there’s only so much real estate up there. The charge controllers would work, but they wouldn’t work well together. So we ended up scrapping that idea and got rid of the old panels.

All the different types and sizes of panels was turning the RV roof into a giant jigsaw puzzle. I quickly noticed that residential panels get you a lot more bang for your buck. The sizes of residential panels was complicating things though, most were about 40 inches wide. Trying to squeeze them around the air conditioners, skylights, vents, and everything else up there was going to be tricky. I saw a post in a Facebook group about some used residential panels that were only 32 inches wide, this sounded perfect. I was trying to avoid using the commonly used 100-200 watt panels. That route would require (15) 100 watt panels along with all the wiring, brackets, and bracket mounting screws through the roof that goes with them. I was trying to put the most watts up there with the least amount of panels. For the most efficient use of the roof top space, use a solar panel rail system and add the large residential panels (I didn’t go this route). There are tons of options out there, find what works for you.
Here is the solar diagram I created to use as a reference (as you can see it’s not professional, but it got the job done)

Solar Panels
(6) used Sunpower 250 watt residential panels. They were on sale at SanTan Solar for $81 a piece and shipping to where we were in Oregon was $115. We will be running them in series parallel, 2 strings of 3 panels. This will be sending 146.4v (VOC) and 13.12A (ISC) to the charge controller.
Specifications:
Rated Power: 250W
Open circuit voltage (VOC): 48.8V
Max power voltage (VMP): 40.5 V
Short circuit current (ISC): 6.56A
Max power current: 6.17 A
Maximum system voltage: 600V UL
Power Tolerance: -3%/+5%
Number of Cell: 72
Fuse Rating: 20 A
IP65 3 diode Junction Box with MC4 compatible connectors
Frame: Anodized black aluminum alloy
Weight: 33 lbs
Dimensions: 61.4″ x 31.4″ x 1.8″
This was one of the best options I could come up with at the time (there are many options) based on the roof measurements, this would also leave a little extra room on the roof in case we wanted to add more later. For now, we’ll be testing this system to see if it will meet our needs. I did run some extra 8awg wire from the roof to the battery bay just in case we do want to add a little more later.
Solar Panel Wiring
I purchased the Bouge RV Crimping Tool Kit, Bouge MC4 connectors, Bouge RV Y branch connectors, and 50ft Temco 10awg Solar Wire to make my own custom length wire. I used all black wire on the roof, but I did add a section of red shrink wrap to the ends of the positive wires. I recommend purchasing the kit to make your own wire so you can change the length of the wire as needed for your install.

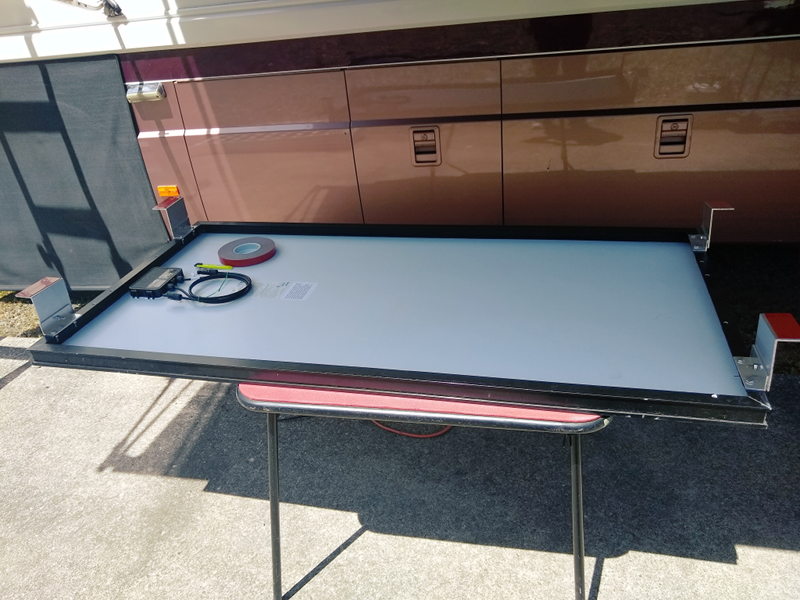
Brackets
For the brackets I went the DIY route and found some 4” X 2” aluminum angle on Ebay and some 1.5” X 1.5” aluminum angle. This is a tall bracket which will allow more airflow under the panels to keep them cool and will also help keep the panels higher to avoid the shadows of the a/c’s. Using the two separate pieces will allow the brackets to tilt (if needed) and to account for the curvature of the roof. I cut all the brackets with a hacksaw due to the Covid virus (everything was closed) and (what I considered to be) ridiculous prices for brackets online. Don’t do this, cutting that much aluminum takes forever. If you don’t have a power saw that can cut metal, just buy the brackets or find a fabricator, your arms/shoulders/back will thank me later. I went to a local hardware store and found the (SS) stainless steel screws, bolts, lock washers, and nuts I would use for the brackets. I had some Norton double sided tape from a prior project, so I used that on the bottom of the brackets and then used 3/4” SS flat head wood screws to mount the brackets. Many others have used 1″ screws as well, but I opted for the 3/4″. I recommend drilling pilot holes in the fiberglass before using the screws. I added 2” Eternabond over top of screw heads/brackets and Dicor around the edge of the Eternabond. It should be water tight for a very long time.

Electrical Cabinet above Fridge
 We added a terminal block and breaker in the cabinet above the fridge. We used the Dinkle assembly Kit for the terminal block, it comes with jumper pins to allow for different configurations if we decide to change something later. The voltage from the panels can be just over 150 volts, 150v is the max on many breakers we looked at. Not wanting to push the limits of a breaker, we went with the
 Midnite Solar 300V 20A breaker (add the Midnite Solar 300V 30A breaker that I should have but didn’t). The electrical cabinet already housed a number of other electrical items, the old solar controller, fuses, and wiring. The cabinet also had plenty of room and would allow us to have an easily accessible shutoff switch inside the RV. I also saved the prior solar wiring from the roof to the terminal block and added another extra pair of wires there as well. In case we wanted to change the setup or add more solar. We had to remove the fridge in order to run these wires and it wasn’t fun. I prefer to do things only once if possible.

Interior Wires
In our case we already had a hole in the roof above the residential fridge. The previous owner ran the solar wires under the base of a sewer vent cap. It wasn’t a functional sewer vent, the cap just covered the hole. No need to create another hole, we’ll use one that’s already there. Although, I removed the old vent and added a small plastic junction box outfitted with some cable glands (I only used the PG7 glands for 10awg) to create a waterproof entry for the wires. The wires drop down behind the fridge and connect to the DIN rail mounted terminal block and Midnite Solar 20A 300V Breaker (see electrical cabinet section above). The wires exit this cabinet and drop down behind the fridge, through the floor, and into a PVC conduit I added between the frame rails. This conduit is about 12ft or so, it runs from the Aqua-hot bay (center RV bay) to the battery bay (the bay right behind drivers side front wheel). The conduit made running the wires much easier and will protect them, it just seemed like a good idea. I also cut and inserted pieces of the PVC conduit where the wires go through holes in the floor or wall to protect the wires from sharp edges or chafing. We used 6awg for the main solar array and since we’re already adding wire, we might as well add an extra set of 8awg wires just in case we want to add more later. It’s a large pain running these wires, I don’t want to do it again if we add more solar later.

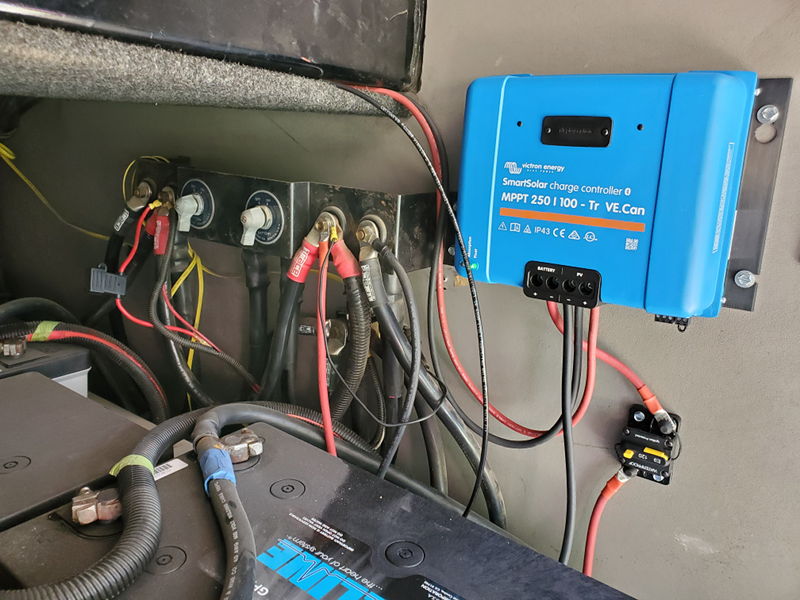
Charge Controller
There are many options for a charge controller, I tried finding a used one but the prices seemed too high. Northern Arizona Wind and Sun was having a Earth Day special, 10% off everything. We purchased a Victron 250/100 Charge Controller and we been very pleased with it so far. I like the ability to connect to it via bluetooth with my phone, this allows monitoring and the ability to change settings. The 6 awg wire runs from the terminal block to the charge controller (bought 30ft and used 25ft) and the we used 4 awg wire (bought 5ft and used 3ft) from the controller to the breaker and then to the batteries. We added a 120A manual reset breaker between the controller and the batteries, now we have a solar shutoff near the solar panels and near the batteries. Our install required us to use 3/8” and 1/4” ring terminals on the ends of the 4awg wire at the breaker and the batteries.
I need to find someone with a drone to take a better picture of the panels on the roof, I just couldn’t get high enough to get a good picture of the whole roof. We look forward to really testing this array later this year in Montana and down in Arizona for winter. Hopefully this description of our solar install will inspire someone to do their own. Don’t take any of this information as professional advice, you should get that from an electrical engineer or an electrician.
*Total Cost
The total cost of all parts was just over $1800 as a DIY project. There are plenty of different ways to get this cost lower, but I’m very happy with the outcome and products so far. The largest single item cost was the Victron 250/100 Charge Controller ($870 w/shipping), it was a bit of a splurge but I don’t regret it. Running the panels in 3 strings of 2 would require a bit more wire but would have allowed us to use the Victron 150/100 and save $100 by lowering the voltage.
Parts List
List also available on Our Gear Page
(6) SUNPOWER 250W Mono Solar Panels (1500W Total)
Victron SmartSolar MPPT 250/100 Charge Controller 250V 100A With Bluetooth
BougeRV Solar Connectors Crimper Tool Kit
BougeRV 12 PCS Solar MC4 Connectors
BougeRV Solar Y Branch Connectors
Junction Box (Check size, you may need a larger box than we did)
MidNite Solar Breaker 20A 300VDC MNEPV20 This is a better option and sized correctly to the wire, Midnite Solar Breaker 30A 300VDC MNEPV30.
120A Circuit Breaker w/Manual Reset
6 awg 30ft Flexible Cable Wire
Dicor Self Leveling Lap Sealant
Step Drill Bit (came in handy multiple times)
4″X2″ Aluminum Angle for brackets
Don’t forget the screws, bolts, nuts, washers (sizes will vary depending on application)

Wow, this is incredible! What a great investment in both material and experiential capital 👌
Totally agree Lynn. I think we covered many forms of capital on this project… Thanks!
Thank you for sharing this detailed recap of your experience. We were based in NW WA and full timed for two years from 2014-2016 in a ’99 Monaco Dynasty. We’ve been living in Hawaii since, but will be moving back to the mainland to RV again in 2021. I want to crank up the solar/battery capacity, and I’m a little intimidated by the installed cost or the DIY option. I’m a fairly technical person, but I don’t want to burn my coach down by doing something wrong.
Thanks! We almost bought a 99 Dynasty back in 2016 before we found our 97 Signature, it was a sweet rig! I had those same worries about burning the coach down but I didn’t want to pay the enormous cost of having someone else do it. When it comes down to wiring for solar, it’s actually pretty simple. My mind was making it a bigger deal than it actually was. Now that we’ve had the solar awhile, I can say we don’t need to run the generator on sunny days anymore! It’s awesome! If you have questions I might be able to answer, feel free to ask. I know how intimidating it can be. Maybe we’ll cross paths in WA next year!